User Guide
Answers to commonly asked questions
About Formitize
Formitize is a mobile business platform to help you run your business smarter and get paperless! We work in more than 250 industries all over the world. The solution includes a mobile app for mobile environments and a secure web based management portal for desktop environments.
The Formitize product is an all in one solution that includes CRM, Job Management, Scheduling, Document Management, Sales Pipeline, Quote and Invoicing Solutions together with flexible forms that can be adapted to any industry or business process.
Our goal is to help you get your business paperless and operating as efficiently as possible.
Every client is different and is looking for different functionality so we have a range of solutions available.
The Solution Modules work beautifully together as a total business solution or you can select just the modules that you need.
Features include:
Smart Mobile Forms
CRM - Customer Database
Job Scheduling, Dispatch and Management
Sales Pipeline & Lead Management
Workflows & Automation
Quoting, Invoicing & Purchasing
Task Management
Work Safety Solutions
Document Management
Franchise Solutions
Let us know what you are looking for and how we can help.
Although Formitize works with Government Agencies and many of the world’s largest corporations we also have a real passion for helping small business and have helped thousands of very small businesses all over the world.
Formitize are in more than 250 industries globally including Aeronautical, Audit Survey, Chemical, Call Centers, Construction, Communication, Education, Environmental, Facility Management, Field Sales and Service, Financial Services, Food and Hygiene, Health and Safety, Healthcare, Hospitality, Inspections, Manufacturing, Merchandising, Mining, Pest Control, Production, Professional Services, Property, Retail, Transport, Utilities, Agriculture, Councils and Government.
In a nutshell, Formitize can help any business that uses paper away from their office desks.
We have more than 250 industry solutions covering most major sectors, especially those that have field based activities, inspections, audits and reports generated away from the office. We adapt the solution for both the industry and the countries that are using it.
Our general solutions include:
Smart Mobile Forms
CRM - Customer Database
Job Scheduling, Dispatch and Management
Sales Pipeline & Lead Management
Workflows & Automation
Quoting, Invoicing & Purchasing
Task Management
Work Safety Solutions
Document Management
Franchise Solutions
We want to make sure you understand and love Formitize before you invest any money, so we offer a proof of concept free trial. There is no cost, no obligation and no credit card details are requested, we just want you to see for yourself how we can help. If you have a particular paperwork pain point in your business, we will happily Formitize your form for you and convert it into a smart mobile form with awesome features and workflows to show you what it can do and how it will help. If you would like more help with your Formitize Free Trial please contact us at info@formitize.com or book a free virtual walkthrough and we can show you around; https://calendly.com/demo-team-/30-minute-walkthrough
There are two parts to Formitize:
1. The App, which is all about collecting information in the field as efficiently as possible.

2. The Management Portal, which has lots of features but it’s core functions are to build forms, create jobs to send to the App users and then to receive the completed forms back from the App and process the information.

It is really important to us to prove that we are the right solution for you. So we offer a Free Trial period to test Formitize and see how it will work for you. To help with this trial, we also offer to build one of your forms for you for free as a proof of concept.
Formitize includes a Form Wizard and a DIY Form Builder so you can create your own forms, but let us help you get your Free Trial off to a great start by building your form for you.
If you would like help with your forms please contact info@formitize.com
Getting Setup
Each user will be sent a confirmation email with their own Login details when an account is created and users are added. The Administrator of your account within your business is able to update and change your log in details. If you have any troubles logging in please contact us at support@formitize.com

Your username will identify you as a user in Formitize. As a user you will be able to receive jobs and tasks assigned to you. Your welcome email will provide you with your username and password, which you can change or customize once logged in. You require your Company, Username and Password in order to login to Formitize. The login details are case sensitive so please ensure to enter in the details as they appear including capitals and spaces.
If you are experiencing troubles logging into as Users account please contact support@formitize.com
If you are a User with the permission to edit User profiles you will be able to update yours and others User Details, if you do not have this permission you will only be able to update your own user information.
To change a password and username you will need to be logged into the Management Portal,
- Select Settings from the top menu bar.
- Then Select User Profile from the drop-down menu.
If you have the permissions and would like to update and change another users details from the Management Portal
- Select User from the top menu bar.
- Select View Users from the drop-down menu.
- You will then be able to select Edit on the user whos details you would like to update.
- You can then update the Users Username and Password by selecting the Blue Pencil on the user profile screen.
If you are receiving an Invalid details message please make sure that the login details are correctly entered. Please note that they are case sensitive with no spaces. Often your device spell check will adjust your entry so please check that also.
For login details, check first if you still have your welcome email with your login details.
Or an administrator can change your log in details for you (Please see: How do I change my password or username?)
Alternatively, we can resend you your log in details by emailing support@formitize.com .
Once you log into the app you will find the Help section in the App is located on the home page. When you click on the Help section, you will also find the User Guide and Support Ticket buttons.
To log into the Management Portal go to https://service.formitize.com.au, you will need your Log in details, these were sent to you when you created your Formitize account, the emails subject is "Your Formitize Account Details" to log in you will need:
Company
Username
Password
Users
A User is anyone that is accessing the Formitize solution at any time in any way. Some Users will only use the secure web-based Management Portal, others will use the mobile app and some will use both.
There are 3 User types:
-
Administrator - has full account authority
-
Portal User - has access to both the App and the Management Portal. The Administrator can decide what access, visibility and permissions the Portal User has.
- Field User - has access to the mobile App only. The Administrator can decide what access, visibility and permissions the App User has.
New Users can be added, edited and made Inactive via the Users menu
To add new Users via the Management Portal,

- Select Users from the top menu bar.
- From the drop-down select New Users.

User permissions allow you to control what different users can access within the Management Portal and the App. To edit a Users Permissions from the Management Portal,
- Select Users from the top menu bar.
- Select View Users from the drop-down.
- Click on the Users name you would like to edit
- This will take you into the users Profile where you can add and remove User Permissions
- Select Save at the bottom to save any changes that have been made to the Users profile.

Users can be added, edited and made inactive (removed) via the Users menu.
To edit a User from the Management Portal
- Select Users from the top menu bar.
- Select View Users from the drop-down.
- Select the User from the list which will take you into the User's profile where you can edit the details as required.
To make a User Inactive (Remove the user)
- Select Users from the top menu bar.
- Select View Users from the drop-down.
- Select the Check box to the right hand side of the Users name you would like to Deactivate.
- Click the Select Action drop-down at the bottom of the screen.
- Choose Deactivate from the drop-down.
- Press Go.
For users that leave the business and their user profile is made inactive, Recurring and assigned jobs will need to be edited and assigned to an active user. This can be completed in bulk; Management Portal > Jobs > Assigned to (select the inactive user profile) > Select the jobs > select action at the bottom of the page > Assign to > Select user > Go.
User groups enable you to segment your users into different categories. You can create different User Groups and then assign individual Users to one or more Groups. Groups are a useful way to assign different Forms and Resources to different user types.
For example you may have a Technical Team and a Sales Team that use different forms and resources.
To avoid confusion you can create a Technical Group and a Sales Group, assign the Users to the relevant Group and then assign the Forms and Resources to the relevant Group so that Users can only view items relevant to their job role. You can also filter the scheduler to show different User Groups.
Please note, when you create a New User, you must assign them to at least one User Group.
Every User needs to be assigned to atleast 1 group, for this reason Formitize has created you a default group called "Main" If you have not created any additional groups, all Users can simply be added to the Main Group.
Each User needs to be allocated to at least 1 user group, and this can be the default Group "Main", there is no need to create more groups if you choose not to.
You can create new groups in the Management Portal,
- Select Users from the top menu bar.
- Select Groups from the drop-down.
- Click the +New Group button on the top right hand corner.

To edit a group in your Management Portal,
- Select Users from the top menu bar.
- Select Groups from the drop-down.
- click edit on the group you would like to change.
To delete a User Group
- Select Users from the top menu bar.
- Select Groups from the drop-down.
- Check the box to the right hand side of the Group you would like to delete.
- Scroll to the bottom and Select Action.
- Select Delete from the drop-down.
- Press Go.

The user profile photo can be edited through the Management Portal > Users > View users > Edit. Using the blue pencil you can edit the user profile details and image.
The image on the user profile can be used in Job Type template as placeholder within communication. For example an email can be sent to the customer regarding a job to show a photo of the person who will be attending the job.
User details can be updated in the user profile on the Management Portal.
Users > View Users > Edit for the user that you would like to update > blue pencil to edit information, make changes and save.
App
The name of the app is Formitize.
The App is designed to be used out in the field. It has most of the same functionality as the Management Portal but is optimized to work on your mobile phone or tablet.
To Get Started, download the Formitize App from the:
Apple App Store if you use apple devices
Or Google Play Store if you use Android devices.
You will be sent your Login Details (Username and Password) when your account is set up.
The App is optimized for tablets but will work beautifully on smartphones too. You can use Apple or Android Devices with Google Play.
If you lose your phone or tablet, don’t worry, your submitted data is saved in the cloud and backed up so you will not lose any of that data. If you have started forms on the device as long as they have been saved they will appear on the Management Portal.
When the device is replaced, simply login and your account will be setup with all saved data restored.
If the device has been set to remember the password, then you will need to access your Management Portal and change your password to ensure the account's security.
In the App, log in page, the current version number displays in the bottom right corner.

To update the app on your device, go to your app store, search for Formitize and select update. We regularly release new version updates so we encourage you to tag Formitize as an app you would like to auto-update so that it automatically updates every time we release a new version.
Syncing ensures all information stored in the App is up to date. The App will sync automatically however you can enable a Forced Sync to ensure the app is up to date.
Force Syncing is an action in the App to ensure the syncing process is up to date.
To force sync the app:
1. Go to the App home screen page shown below.
2. Pull the screen down with your finger until you see the grey arrow (above the Jobs icon) change direction and point to the top of the screen.
3. Then release your finger, the arrow will return to the top of the screen pointing down - this forces the sync. You will see the syncing bar triggering at the bottom of the page.You can use the app on multiple devices. Simply use the same login details in your devices.
The Management Portal
The Management Portal is the main control centre for your account. The Portal is where you manage your account details, settings and user permissions. It is a secure website which means you can access it anywhere in the world with an internet connection. Please note the Management Portal is optimised for the Google Chrome browser and whilst other browsers will essentially work, the experience is enhanced for Google Chrome.
There are a number of elements that are only available in the Management Portal like the Full Scheduler, a number of the account customizations and User Settings.
You can access the Portal from the www.formitize.com website. In the top right hand corner, click on the Login button.
You can access the Management Portal on different devices although it is best viewed on a larger screen like your desktop or laptop and is optimised for the Google Chrome browser.
Yes, the Management Portal is an SSL secure website. The Portal is where you manage your account details, settings and user permissions.
To log into the Management Portal go to https://service.formitize.com.au to Log in, you will need your Log in details, these were sent to you when you created your Formitize account, the emails subject is "Your Formitize Account Details" to log in you will need:
Company
Username
Password
Customizing
In the Management Portal, you have the option of changing your:
1. App Logos and Colours
2. Form Headers and Logos
3. PDF Reports & Invoices
4. Management Portal logo and colours.
To do this go to Management Portal > Settings cog > Company Profile.
To add your logo in the Management Portal
- Select Settings cog from the top menu bar.
- From the drop-down select Company Profile.
- Logo and colour
- You can then upload your logo by select Choose File in jpeg or png format.
You can customize the App logo from the Management Portal.
- Select Settings cog from the top menu bar.
- From the drop-down select Company Profile
- Logo and colour
- You will then be able to add your App related logo's into section 3 of this screen.

You can select your customized theme color in the Management Portal
- Select Settings cog from the top menu bar
- From the drop-down menu select Company Profile.
- Logo and color
- You can then use the color selector to choose which color you would like to choose for your account Theme.
Handy Hint: The color chosen will show in both the Management Portal and the App so ensure you don't choose a color that is too light as it may make viewing the icons in the App difficult for the users.

From the Management Portal you are able to turn off sections that the User is unable to Access but they will still be able to see the Icons for these sections but will not be able to access them.
- Select Users from the top menu bar.
- From the drop-down you will select View Users.
- From here you will select the Users whose permissions you would like to edit.
- On the right hand Panel you will see a list of permission, you can de-select any check boxes you do not wish the User to access.
- Scroll to the bottom and save.

Getting Help
In the top right hand corner of your Management Portal you will find the Help Menu.

Contacting Technical Support is fast and easy using the App,
- Select the Help icon.
- Select the Support Ticket icon.
- Fill out the form and send. It’s automatically forwarded to our Technical Support team and will be directed to the correct team based on the details in your request.
In the Management Portal,
- Select Help from the top menu bar.
- Select Support Ticket from the drop-down.
- This opens up the Support Wizard, where you can fill out a form to help you get your issues resolved ASAP. Clicking send forwards the form directly to our Technical Support team.
You can also email our Technical Support team via support@formitize.com
You may email support using support@formitize.com
For speed of service, please contact our Support Team through the Help Menu either in your App or Management Portal. This will ensure that your request is managed in the fastest possible way. Based on your country, the device you are using and the nature of your support ticket, we can direct your request to the best responder and ensure help is provided as soon as possible.
Here are our main Formitize numbers:
USA & Canada: 1800 785 7508
Australia: 1 300 552 008
United Kingdom: 0808 234 4230
New Zealand: 0800 854 764
Singapore: 800 852 3084
Account Details
You can view and edit company account details under the Settings section of the Management Portal.
- Select Settings cog from the top menu bar.
- Choose Company Profile
- Company Details
- Once you have updated your Company information select Save.
Handy Hint: If you have created Invoices, Quotes, forms etc. and you would like them to have your newest company information reflected, you can simply re-save them and the new information you have just added will update for you.
You can change all of the following items:
Company / Business Number
Company Name
Company Address
Website
Phone Number
Suburb
Post Code
State
Country
Email From (email address)
Email From (name)
Email Reply to
Name
Address
Website
Company Fax
Company Mobile
New Users can be added, edited and made Inactive via the Users menu
To add new Users via the Management Portal,
- Select Users from the top menu bar.
- From the drop-down select New Users.
We would hate to see you go! If you would like to discuss your account and the reasons why you are thinking of leaving, so that we can help you and your business, please contact your local Formitize office for a chat.
USA and Canada: 1800 785 7508
Australia: 1300 552 008
United Kingdom: 0808 234 4230
New Zealand: 0800 854 764
Singapore: 800 852 3084
- Select Users from the top menu bar
- Choose View Users from the drop-down menu.
- Select all Users on the account by checking the box next to each user.
- Click on Select Action at the bottom of the screen.
- Choose Deactivate on the drop down menu.
- Press the Go button to process this action.
CRM
The Formitize CRM is a fully integrated, cloud based Customer Relationship Management System. It is basically your customer database designed to store your customer and supplier contact information and to record all communications, transactions, job details, sales leads, quoted invoices and history with those contacts.
Whist the CRM works beautifully as a stand-alone solution for any business, it is perfect for field based teams with job management, job scheduling and automated reminder solutions integrated.
CRM CONTACTS VIDEO
You don’t have to use the CRM however it is a useful tool to keep all of your client details in one place and has many time saving and automated tools to help with business efficiency.
The Formitize CRM also includes an efficient internal Task Management system, a Lead Follow Up solution and a Job Quoting solution to ensure maximum conversions and efficient, professional client communication.
You will find CRM in the upper left corner of your Management Portal next to Home.

The Mobile App splits the elements of the CRM into different modules including Contacts, Accounts, Diary, Jobs and Leads so that modules can be turned on and off for different users. The Contacts Module is the central hub for all customer details and activity in the App and includes links to other modules.
Invoices
With the correct permissions, Invoices can be created in both the Management Portal and the App.
To create Invoices using the Management Portal,
- Select CRM from the top menu bar
- Select Invoices from the drop-down menu.
- On the right hand side of the screen select the Green + New Invoice button.

To create Invoices using the App,
- Select the Accounts icon.
- Select the Invoices icon.
- Press the + button in the bottom right hand corner of your screen.

To edit Invoices using the Management Portal,
- Select CRM from the top menu bar
- Select Invoices from the drop-down menu.
- Select Edit on the Invoice you would like to change.

To Edit Invoices using the App,
- Select the Accounts icon.
- Select the Invoices icon.
- Select the Invoice you would like to Edit.
- Scroll to the bottom and select the green Edit button.

To Archive an Invoice in the Management Portal,
- Select CRM from the top menu bar.
- From the drop-down select Invoices.
- Check the box next to the Invoice you are wanting to Archive.
- At the bottom of the page select the Select Action drop-down.
- Choose Archive from the drop-down.
- Press Go to Archive the Invoice.

To view the invoice PDF using the App,
- Select the Accounts icon.
- Select Invoices
- Select the Invoice you would like to view.
- Scroll down to the bottom of the Invoice and click the red View.

To view the Invoice PDF using the Management Portal,
- Select the CRM from the top menu bar.
- From the drop-down select Invoices
- To the right of the Invoice that you would like to view, click the blue PDF link.

You are able to add Line Items through your settings,
- Select Settings cog from the top menu bar.
- Accounts
- Items
- Select the green + New Item button to add a new Item.

Alternatively you are able to add line items when you create an Invoice
- Select CRM from the top menu bar
- Select Invoices from the drop-down menu.
- On the right hand side of the screen, select the Green + New Invoice button.
- Whilst creating the Invoice you will select the item drop-down.
- Select New Item from the Menu.

Line Items do not need to have an Item Code.
One off Notes can be added to your Customers Invoice using the Notes section above the Payment Details, these notes will appear on the Invoice PDF.

To add a Photo to an Invoice in the Management Portal, the Invoice will need to be saved first. Once the Invoice is saved you can,
- Select Edit on the Invoice you would like to add the Image to.
- Select the Attachments tab on the Invoice.
- You can then Click or drag and drop your Images to the Invoice.
- These images will appear on page 2 of your Invoice PDF.

To add photos to an Invoice in the App, the Invoice will need to be saved first. Once the Invoice is saved you can,
- Select the Invoice you would like to add the Image to.
- Select the Attachments tab on the Invoice.
- Select the + symbol in the bottom right hand corner.
- You can then choose to either select an Image from your device Library or Take a Photo.
- These images will appear on page 2 of your Invoice PDF.
You can take a payment from an Invoice in the Management Portal,
- Select the Invoice you would like to take the payment on.
- Add the Amount Paid.
- Select the Payment Method.
- The other details will pre-populate for you but can be changed if required.
- Select Add Payment.

Payment can also be taken in the App,
- Swipe left on the Invoice you would like to take the payment on.
- Select the Payment Method.
- The other details will pre-populate for you but can be changed if required.
- Select Add Payment.
You can view all payments received by going to your Management Portal,
- Select CRM from the top menu bar.
- From the drop-down select Payments
Yes. You can take payments through Formitize. If you would like to take immediate card payment, you will need to set up an account with Stripe.com.
To take card payments through the Management Portal,
- Open the Invoice you would like to receive the payment on.
- Under the Payment Details section, select Card.
- The Credit Card options will appear and select Take Payment.
- This will open you Stripe integration where you will be able to take your card payment.
To take a card payments using the App,

- Swipe right on the Invoice you would like to take the Payment on.
- Select the Orange Take Payment option.
- Under the Paid by option select Card.
- The Credit Card option will appear, select Take Payment
Formitize CRM has a complete two-way integration with XERO.
You can set up your Xero Integration from the Management Portal quickly and easily.
- Select Settings cog from the top menu bar.
- Integrate
- Accounting Software
- From the drop-down, select Xero.
- You will then be taken into your Xero Account to finish the Integration process.

Invoices that are attached to Jobs as a Draft Invoice can automatically be Converted to an Open Invoice when the Job is created or when the Job is completed.
You can choose at which stage you would like this to happen within your Invoice settings in the Management Portal.
- Select Settings cog from the top menu bar.
- Accounts
- Invoices
- Choose the option you would like to trigger the Invoice to go from Draft to Open.
- Scroll to the bottom on the page and select Save.

There are certain settings that are available to you to customize the information that is sent to your Xero Invoices, to access these settings in the Management Portal,
- Select Settings cog from the top menu bar.
- Accounts
- Invoices
- Scroll down to the Xero Settings.
- Once you have selected your default settings you will select Save at the bottom of the page.

You are able to customise certain options that appear on your Invoice PDF from the Management Portal,
- Select Settings cog from the top menu bar.
- Accounts
- Invoices
- Scroll down to the Invoice PDF Options Sections.
- Once you have selected your PDF Options you will select Save at the bottom of the page.

The Invoice Email is the default text or template when you are sending an Invoice via Email.
You can set this up by going to your Management Portal,
- Select Settings cog from the top menu bar.
- Accounts
- Invoices
- Scroll down to the Invoice Email.
- Once you have changed your default Email, you will select Save at the bottom of the page.

The Default Email Attachments lets you add an attachment such as Terms & Conditions or another Resource Document to send automatocally with your Invoice Email.
This can be set by going to your Management Portal,
- Select Settings cog from the top menu bar.
- Accounts
- Invoices
- Scroll down to the Default Email Attachments.
- Once you have your default Email, you will select Save at the bottom of the page.

Your business Bank Account details can be added together with your Invoice Payment Terms & Conditions.
To add your Bank Account details and any other payments terms and conditions that you would like to appear on your invoice.
- Select Settings cog from the top menu bar.
- Accounts
- Invoices
- Scroll down on this page until you come to Invoice Payment Terms & Conditions.

The outstanding invoice reminders enables you to set up your own customised emails, SMS, letters and tasks to trigger automatically whenever an invoice becomes X number of hours, days or months either before the due date or after the invoice is due.
Once they're set up, they will automatically chase those outstanding invoices for you.
- Select Settings cog from the top menu bar.
- Smart-Assist
- Invoices - Accounts Assistant
- Scroll down to the Outstanding Invoice Reminders.
- Once you have set up your Invoice reminders, Save at the bottom of the page.

Your invoice can include a remittance payment details section. This is a section at the bottom of invoices that is designed for your customer to manually cut off, complete and send back with payment.
- Select Settings cog from the top Menu Bar.
- Accounts
- Invoices
- Scroll down to the section titled Invoice PDF Options.

Invoice Prefix is the information positioned in-front of the Invoice Number, we use “INV -” as your default. You can change this to whatever your company would prefer.
We can automatically increase the Invoice number sequentially for you. You may want to start doing this from a particular Invoice number, please enter those details in the invoice settings otherwise the system will start from INV-00001.
To Customize these settings,
- Select Settings cog from the top menu bar.
- Accounts
- Invoices
- Scroll down to Invoice Prefix and Automatic Sequential Numbering.
- You can specify your settings here.
- Select Save when done.

This sets the default Payment terms for your account.
To customize these settings
- Select Settings cog from the top menu bar.
- Accounts
- Invoices
- Scroll down to the Default Invoice Payment Terms.
- Once you have selected your default settings you will select Save at the bottom of the page.

Handy Hint: If you have specific customers who will have different Payments Terms to your Default Payments Terms, you can Customise the Payment Terms for each customer within the customers card in the CRM.
To add a One-off Attachment the Invoice need to first be created and saved. Once you have saved the Invoice you can edit it and add one-off attachments.
- Open the Invoice you would like to add the attachement to.
- Click on the Attachments tab.
- Add your Attachments.
- Save the Invoice.
- The attachments will appear on the second page of the Invoice PDF

You can view the email history of an Invoice through both the Management Portal and the App.
From the Management Portal,
- Open the Invoice.
- Scroll down to the History/Notes.
- This will show all manual and automated emails that have been sent relating to this Invoice.

From within the App,
- Open the Invoice.
- Scroll down to the History/Notes.
- This will show all manual and automated emails that have been sent relating to this Invoice.

To customize your Default Payment Account in the Management Portal,
- Select Settings cog from the top menu bar.
- Accounts
- Invoices
- Scroll down to the Invoice Defaults.
- Once you have selected your default settings you will select Save at the bottom of the page.

This sets the default tax Types for your account.
To customize these settings in the Management Portal,
- Select Settings cog from the top menu bar.
- Accounts
- Invoices
- Scroll down to the Invoice Defaults.
- Once you have selected your default settings you will select Save at the bottom of the page.

Yes, you can Convert a Formitize Invoice to a Job in both the Management Portal and the App
In the Management Portal,
- Open the Invoice you would like to convert to a Job.
- At the bottom of the Invoice select Convert to a Job.

In the App,
- Open the Invoice you would like to convert to a Job.
- At the bottom of the Invoice select Convert to a Job.

The billing terms on your account can be updated in the Management Portal > Settings Cog > Accounts > Invoices > Billing Terms. You can also have billing terms for customers indivdually in the CRM, contacts > edit pencil > billing terms.
An invoice can be cancelled through the App, simply swipe to the left to cancel the invoice.
In the Management Portal an invoice can be archived by selecting one or multiple invoices in the CRM > Invoices list using the check box on the far righthand side of the page, scroll to the bottom pf the page, select action > archive > go.
An invoice can be sent from the app following these steps;
Create invoice and Settings cog >roll to the bottom > select EMAIL button.
or
In the invoice list swipe to the right of the invoice to email the invoice.
In the Management Portal an invoice can be viewed > CRM > Invoices > View PDF > Email.
Quotes
Some Clients will ask for a Quotation or Estimate to be sent before doing the job. Quotes are managed through the Accounts Module.
An estimate can be useful if you just want a rough idea of cost.
Once you get an estimate and decide to use that trader you should then get a proper quote in writing.
A quote is an offer to do a job at a certain price. If you accept a quote, then the trader can't charge you more than the quoted price.
There are a number of ways to create a Quote,
From within the Management Portal,
- Select CRM from the top menu bar.
- From the drop-down select Quotes.
- On the right hand side of the Quotes page select +New Quote.

To create Quotes from the App,
- Select the Accounts Icon.
- Choose Quotes from the Accounts Options.
- Press the + button in the bottom right hand corner of the App screen.
.
The Default Email Attachments allows you add an attachment such as Terms & Conditions or another Resource Document to send automatically with your Quote Email.
This can be set by going to your Management Portal,
- Select Settings cog from the top menu bar.
- Accounts.
- Select the Quotes tab.
- Scroll down to the Default Email Attachments.
- Once you have added your Default Email Attachments, you will select Save at the bottom of the page.

One off Notes can be added to your Customers Quotes using the Notes section, these notes will appear on the Quote PDF.

Quote settings are found within the Management Portal,
- Select Settings cog from the top Menu Bar,
- Accounts
- Choose the Quotes Tab.

Quote Prefix is the information positioned in-front of the Quote Number, we use “QU -” as your default. You can change this to whatever your company would prefer.
We can automatically increase the Quote number sequentially for you. You may want to start doing this from a particular Quote number, please enter those details in the Quote settings otherwise the system will start from QU-00001.
To Customize these settings,
- Select Settings cog from the top menu bar.
- Accounts
- Select the Quotes tab.
- Scroll down to Quote Prefix and Automatic Sequential Numbering.
- You can specify your settings here.
- Select Save when done.

You are able to add an automatic default Quote Title from with the Quote Settings,
- Select Settings cog from the top menu bar.
- Accounts
- Select the Quotes tab.
- Scroll down to Quote Title.
- You can specify your Default Quote Title here.
- Select Save when done.

Under Quote Terms & Conditions, you can add any terms and conditions relevant to your Quote here as default.
You can adjust the terms and conditions on each individual Quote when creating a new Quote, in the Terms Section.
To Add your Quote Term and Conditions,
- Select Settings cog from the top menu bar.
- Accounts
- Select the Quotes tab.
- Scroll down to Quote Terms and Conditions.
- You can specify your settings here.
- Select Save when done.

This is a general summary of services offered in the quotation. You can add a Default Summary that will be used when creating your new Quotes.
To add this through the Management Portal,
- Select Settings cog from the top menu bar.
- Accounts
- Select the Quotes tab.
- Scroll down to Quote Summary.
- You can specify your settings here.
- Select Save when done.

Quote Email is the email that is sent automatically when you email your Quote to your customers.
You can customize the wording of the Email in the your Quote Settings,
- Select Settings cog from the top menu bar.
- Accounts
- Select the Quotes tab.
- Scroll down to Quote Email.
- You can specify your settings here.
- Select Save when done.

Handy Hint: Dont forget to use your Placeholders using the Ctrl + Space, this will allow sections of your email to be automatically populated for you from the information contained in your Quote.
Quote Expiry refers to the period when a quote will remain valid before expiring. A quotation is normally valid for a set period of time.
You can add your default quotation expiry period and also adjust the Quote Expiry period on each individual Quote. In your Management Portal,
- Select Settings cog from the top menu bar.
- Accounts
- Select the Quotes tab.
- Scroll down to Quote Expiry.
- You can specify your settings here.
- Select Save when done.

Quote Reminders are your Automated Assistant, following up a quote that you have created.
Reminders can be sent to clients via Email, Text message and it can create a PDF letter that will email to a particular User to be posted out to the client. Reminders can also create an internal Task to a User to prompt them to take action on Quotes that have been created.
To set up your Automated Reminders from the Management Portal,
- Select Settings cog from the top menu bar.
- Smart Assist
- Quotes - Quotes Assistant
- Scroll down to Quote Reminders.
- You can specify your settings here.
- Select Save when done.

You are able to view your Quotes in both the Management Portal and in the App.
To view your Quotes in the Management Portal,
- Select CRM from the top menu bar.
- Select Quotes from the drop-down.
- Ensure you have the correct filters chosen to show the quotes in each status.

To view your Quote using the App,
- Select the Accounts icon.
- Select Quotes.
- Use the tabs at the top to norrow down your view from All, Open, Won and Lost.

To add a One-off Attachment the Quotes need to first be created and saved. Once you have saved the Quote you can edit it and add one-off attachments.
- Open the Quote you would like to add the attachement to.
- Click on the Attachments tab.
- Add your Attachments.
- Save the Quote.
- The attachments will appear on the second page of the Quote PDF

Yes, you can Convert a Formitize Quote to a Job in both the Management Portal and the App
In the Management Portal,
- Open the Quote you would like to convert to a Job.
- At the bottom of the Quote select Convert to a Job.

In the App,
- Swipe left on the Quote you would like to to a Job.
- Select the Orange Convert to Job option.
Purchases
Purchases refer to the cost of buying inventory for the purpose of sale in the ordinary course of the business.
Purchases may include buying of raw materials in the case of a manufacturing concern or finished goods in the case of a retail business.
To create a new Purchase in the Management Portal,
- Select the CRM from the top menu bar.
- From the drop-down select Purchases.
- Select the +New Purchase button.

To create a new Purchase in the App, go to Accounts>Expenses and then add your New Purchase


In the Management Portal, you will find Purchases Settings in Settings cog > Accounts > Purchases.
Purchase Prefix is the information positioned in-front of the Purchase Order, we use “PO-” as your default, you can change this below.
We can automatically increase the Purchase Order number sequentially for you. You may want us to start doing this from a particular number, you can do this in Settings cog > Accounts > Purchases > Prefix and Automatic Sequence Numbering, otherwise it is set to start start from PO-00001.
Purchase Order Email is the default text for when you are sending a purchase order via email. To set the template for your Purchase email Settings cog > Accounts > Purchases > Purchase order Email
To find your default email attachments for Purchases in your Management Portal, Settings cog > Accounts > Purchases.
To create a new Purchase in the App,
- Select the Accounts Icon.
- From within Accounts select Expenses.
- Select the + button in the bottom right corner to add a new expense
To add photo to Purchases in the App,
- Select the Expense you would like to add the Attachment to.
- Select the Attachments tab.
- Press the + button in the bottom right corner to add an image, this will appear on the second page of the Expense PDF.

Accounts
The Account Settings in the Management Portal, Settings cog > Accounts
The Accounts Module tracks the list and status of all Leads, Quotes, Invoices and Payments.
The Account Types are Financial Accounts category, they could be: Bank Accounts, Current Asset Account, Current Liability Account, Depreciation Account, Direct Costs Account, Equity Account, Expense Account, Fixed Asset Account, Inventory Asset Account, Liability Account, Non-current Asset Account, Other Income Account, Overhead Account, Prepayment Account, Revenue Account, Sale Account, Non-current Liability Account, PAYG Liability Account, Superannuation Expense Account, Superannuation Liability Account, Wages Expense Account and Wages Payable Liability Account.
Account Code is a unique code or description of your account.

Account Name is a short title for your account.

Account Description is a description of how the account should be used.

Account Tax Treatment determines whether you add new tax or existing tax on sales at 10%.

To add new accounts, go to CRM>Click Accounts> +New Account. Fill out the required fields then save.

To edit Accounts, CRM>Accounts then click the Account you wish to edit. Make the necessary changes then Save the Account.

Tax
You will find Tax Settings under Settings cog > Accounts > Tax
To Set up Tax Rates, go to Settings cog > Accounts > Tax Rates and then Edit
To edit Tax Rates, go to Settings cog > Accounts > Tax Rates > Edit
To delete Tax Rates, go to Management Portal > Settings cog > Accounts > Tax rates then select which tax rate you want to delete then check the box of the particular tax. Then go to select action and select Delete.
Items
Items are a product or services being issued by a seller to a buyer.
Items are for Income.
To add Items, just go to the Management Portal, CRM>Accounts>Items>New Item
You can edit Items in the Management Portal by going to CRM>Accounts>Items. Then pick the Item which you want to edit and click Edit.
You can delete Items by going to CRM>Accounts>Items then choose the item you wish to remove and click on the checkbox and then select action then Delete.
Pipeline
You can see the example Sales Stages in the image below > ALL, LOST, WARM, HOT, COLD and CONVERTED. You can have as many stages as you like and call them whatever you choose to suit your business process. NOTE - if you have a lot of stages, the filters below will scroll so that you have access to all of them. When you select on one of the Stages, it will reveal the leads currently set to that Stage.

A Sales Pipeline is a visual representation of your leads and where they are in the purchasing process. The Sales Pipeline assists users in managing new enquiries and making sure a lead is never lost or forgotten.
The Sales Pipeline assists users in managing new enquiries and making sure a lead is never lost or forgotten. The lead can form part of a Sales Pipeline to track where all your Leads are up to.
You may or may not use the Sales Pipeline. If you do choose to use the Sales Pipeline, when you create Leads you are able to assign different stages to that Lead from Cold to Warm to Hot or from Lost to Converted.
A sales lead can also be nurtured through a sales pipeline based on different stages that you can customize for your business.You can customize the Pipeline in Settings cog > Pipeline > Pipeline Stages.
You can set up your stages and the respective % Success Rate in the Management Portal, Settings cog > Pipeline > Pipeline Stages +Add Another Stage
To change the Lead Stage, select the grey “Change Stage” option as above and a dropdown of available stages will appear as below. Simply then select the new Stage and press Save.
Expected Value is the monetary value of the Lead should it be successfully converted to business.
Pipeline Value is the stages and respective % Success Rate of your Leads in the Management Portal.
In the Sales Pipeline, Converted to means converting Leads or sales opportunities to business.
SMS
Short Message Service is a text messaging service component of most telephone, World Wide Web, and mobile device systems. It uses standardized communication protocols to enable mobile devices to exchange short text messages.
You can use SMS messaging to inform your customers about your business, schedules, changes, etc. You can access this feature in your Management Portal, Settings cog > Email and SMS > SMS
Formitize CRM includes the ability to use automated SMS text messages for Updates, Reminders, notification which allows for a more efficient and smooth workflow. Using the SMS feature is not compulsory although if you would like to connect your workflow with the Automated messaging features it must be done through the Formitize provider.
You need to set up an SMS account so you can take full advantage of the direct-to-customers SMS feature that Formitize CRM offers.
To set up SMS Messages in your management portal, go to Settings cog > Email and SMS > SMS, fill out the form and Process Payment.
Formitize offers SMS top ups to your account in increments of $10 credit consumable for each user. The Cost per message is approx 10 cents per SMS.
To top up your SMS balance, go to Settings cog > Email and SMS > SMS > Auto-Topup where you can also set up automated topping up of the account to ensure your service is never interrupted.
To check your SMS Account Balance, go to Settings cog > Accounts > Email and SMS > Current Balance.

To create an SMS template, simply open your Settings cog > Email and SMS > Email template (SMS, email and letter templates are created here) create template and save.
To create an SMS template, Management Portal Settings cog > Email and SMS > Email Templates (Email, SMS and letter templates are visible here) and using the drop down box Template you can view each template you have created.
To edit an SMS Template, Management Portal, Settings cog > Email and SMS > Email Templates (Email, SMS and Letter templates are visible here) and choose the template you would like to edit using the Template drop down box, you will then be able to edit all fields in the Template.
The sent SMS messages will show up in the Timeline, This can be found, Management Portal CRM > Contacts > Communication OR Home > Timeline.
No, the Formitize SMS gateway is used to automatically send texts (SMS) to your customers.
A time restriction can be set for the hours that SMS messages are sent to recipients to avoid very early or very late messages being sent.
Access this setting: Settings cog > Email and SMS > SMS > Automated SMS Reminder Hours
Any SMS scheduled to be sent before the "No Earlier than" time will be held until that time.
Any SMS scheduled to be sent after the "No Later than" time will be held until the next day.
To stop your SMS messages being sent late at night or early in the morning you can Schedule Automated SMS reminders to fall within a certain time-frame during a day.
To set these times, Settings cog > Email and SMS > SMS > Automated SMS reminder Hours.
SMS messages sent through Formitize are a no-reply service. Please have this noted on the messages that you have sent through your account to avoid confusion for your customers.
Yes, you can send emails through Formitize. In your management portal, go to CRM>Contacts then click on the contact to whom you would like to send the email. Under Communications, choose Send>Email. You can create your own templates or populate the email with your stored contact/billing/business details stored in your CRM.
All emails generated through Formitize are logged to ensure accurate delivery. The Home Dashboard on the Management Portal shows recent emails sent and their status.
To customize your email footer in the management portal, go to Settings cog > Email and SMS > Email Footer.
To adjust the "Email sent from" address, go to Settings cog > Company Profile > Company Details > Email From
To set up email templates in your management portal, go to Settings cog > Email and SMS > Email Templates and select Email in the Template Type Drop down box.
You can view your email templates by go to, Settings cog > Email and SMS > Email Templates and select the template you would like to view from the template drop down box.
You can check if the email has been sent by going to the Management Portal, Tools > View Email Log and checking the CRM Related email log.
You can also check if the email has been sent by checking the Timeline on you CRM Dashboard.
Email records are also available in the Submitted Form. Management Portal > Forms > Submitted Forms > Edit > Email Log.

You will find the Sent Email Log under Tools>View Email Logs where you will see the Submitted Forms and CRM-related items where you can track and view email log.

Formitize currently does not support integration with Gmail and other email packages. The email log in the Management Portal provides all email history of submitted PDF reports with a bounce log also.
The automated emails being sent from Formitize will have a reply address of your company email address stored in your Company Profile, to adjust the "Email sent from" address, go to Settings cog > Company Profile > Company Details > Email From.
Each form template can have a different 'reply to' email address, to change individual form templates. Management Portal > Forms > View Form Templates > Actions > Reply To.
Form Actions Tutorial
Email Templates are pre-set email templates that you can use for future correspondence with your clients.
Custom Variables
Custom Variables are your own fields names that are specific to your business. These can be CRM client, location and user variables.
Creating CRM Variables and linking them to a form tutorial
Form / Company User Variables
To set up Custom Variables in your Management Portal;
CRM Variables > Settings cog > Conatcts > Contact Custom Fields
Location Variables > Settings cog > Contacts > Location Custom Fields
User Variables > User > View Users > Edit a user > Add variable at the bottom of the page. This will be available on all user profiles.
You don’t have to have Custom Variables but they are of great help, especially when you’re building your database in your Management Portal. Custom Variables make it easier for you to record, monitor and update your database.
You can have as many Custom Variables as you want. There’s no limit to what you can add in your Management Portal.
To edit or delete Custom Variables,Management Portal, Settings cog > Contacts > (Contact or Location) Custom Variables and when you hover over the end of the line of the Custom Variable it will have a Red Remove Button, by selecting this it will remove the individual Custom Variable chosen.
Templates
A template is a file that serves as a starting point for a new document. When you open a template, it is pre-formatted so you can simply add new data.
To edit/delete templates in your Management Portal, Settings>CRM Settings>Templates and select the template from the drop down box that you would like to Edit.

To add Placeholder information to your Templates, press Ctrl + Space to view Placeholder options then choose the ones you wish to add to your templates. You will see the *Press Ctrl + Space to View Placeholder Options message at the bottom on each screen that this function is available.

Contacts
The Contacts Module is the heart of the CRM.
Contacts are customers / clients and dealers whose details you can store in the Management Portal and the App.
There are 2 ways to get into a Contacts section. You either click on the Contacts button at the top of the CRM page or you can go directly to a contact from the Timeline notes on the left hand side.
To create a New Contact, Management Portal, CRM>Contacts> +New Contact or +New Lead.

To create a new Contact, App, Contacts> + button at the bottom of the screen.
Contacts can also be created when making new jobs, quotes, invoices and in a form with the CRM element.

A lead represents an individual of interest to your qualification and selling efforts. Contacts are non-volatile, longstanding representations of individuals you have done or will likely do business with. Unlike leads, a given individual should be reflected in a single contact record.
The Lead can form part of a Sales Pipeline to track where all your leads are up to.
Yes, creating a new Lead also creates a New Contact.
Customers are individuals or businesses that purchase the goods or services produced by a business. Suppliers are persons or organizations that provide something needed such as a product or service.
To upload existing contact databases, Management Portal, Contacts> +Import where you will find two examples of how the CSV file format needs to be structured. If you are using an Excel spreadsheet, you need to follow the same structure and prepare the format as required. Once you have the correct format, you can convert your Excel file to CSV ready for import by following the steps below:
In Excel, Click "File"
Click the drop-down arrow next to "Save as type."
Select "CSV (Comma delimited) (*.csv)" from the list of potential file types.
Choose the folder where you would like to save the file from the small Explorer area at the top of the window.
Click "Save" to save your file.
Select the new CSV after you push "Choose file" at the bottom of this page.

To edit a contact in the Management Portal, CRM>Contacts Select the client you would like to edit and click the Edit Pencil in the top right hand corner of the Contacts details.
To Edit a Contact in the App, Contact>Select Contact and then select the Action Button ... in the top right hand of the screen, edit Billing Details.


To delete a contact, Management Portal go to CRM>Contacts check the box next to the Contact you want to delete then scroll down to the dropdown menu Select Action(Make Inactive)>Go.

Custom Variables / Fields are your own field names that are specific to your business.
To add a custom field, on the Management Portal,
CRM Variables > Settings cog > Conatcts > Contact Custom Fields
Location Variables > Settings cog > Contacts > Location Custom Fields
User Variables > User > View Users > Edit a user > Add variable at the bottom of the page. This will be available on all user profiles.
In the App, swipe to the right on a Contact that you would like to call, this also applies to sending an SMS or email. The same function is available through the jobs tab also, again by swiping to the right.

To export information from your Contacts, CRM > Reports > Contacts and add your Filters using the +Filters Button. Once you have the Filters that you would like to Export, select the Download CSV Button which will automatically convert your selected Contact information into an Excel Worksheet.
To create a CSV File of your contacts using the Management Portal, CRM > Reports > Contacts > Download CSV. You can add other filters using the + Add Filters button to filter the Contacts who will be sent to the report.
To add Multiple Locations for a Contact in the Management Portal, CRM > Contacts > Select the client you would like to add the Location to, Locations > select drop down box> +Add New Location.
CRM Tutorial
In your contacts you can have your main Billing contact and you can also have other contacts for the same organisation this can be done in the Management Portal and in the App. To add a new person to an existing Contact in the Management Portal, CRM > Contacts > Select the contact you would like to add the person to > Select "People" > Select the Drop down Box > + Add New Contact.
CRM Tutorial
Documents can be added to a contact using the Management Portal, CRM>Contacts>Select the contact that you would like to add the Document to>Scroll down the the activity section of the Contact>Document>+New Document. When uploading the Document you can, Name the Document, Add it to a folder or create a New Folder, create a version for the document and even add an expiry that will allow the system to automatically remind you when the Document is ready to be reviewed or updated.


Yes, you can use the App to view documents that have been added to a Contact. On the App home screen, select Contacts Icon>Select the Contact with the Document you would to view>Select the Document Icon at the top of the screen>Documents>Open the Document you would like to view. If you haven't dowloaded the Document previously the App will ask you if you would like to download the Document.


You can add a Photo to a Customer using the Management Portal, CRM>Contacts>Select the contact you would like to add the Photo to>scroll down to the Activity section of the Contact>Photo>either clock to upload or drag and drop image.


You can add a note either using the Management Portal or the App.
On the Management Portal, CRM>Contacts>Select Contact>Select Notes in Contacts Communication section>+New Note
In the App,Contacts>Select the contact>Select the menu button in the top right hand corner>New Note.
Feature update Notes


Importing Existing Data
You can import an extensive range of information from your existing systems, files and build files to gather information. This information includes:
- Jobs
- Contacts / customers
- Items
- Databases
Jobs can be automatically imported through your existing Xero data and through your Management Portal, Jobs>Import Jobs.

Your existing contact / customer records can be automatically linked through your Xero or you can upload an CSV or excel file. Management Portal, CRM>Contacts> +Import Here you will find detailed instructions on how to import your customer details from various formats.

Items can be automatically imported through your existing Xero data and through your Management Portal, CRM>Accounts>Items>+Import.


Databases can be imported through, Management Portal, Databases>New Database.
Uploading a database into Formitize Tutorial Video
Attaching a database to a Formitize Form
Leads
Leads are potential clients or sales opportunities waiting to be converted to sales.
Lead Pipeline Update
A sales lead can be nurtured through a sales pipeline based on different stages that you can customize for your business. You will receive a Notification when a new lead has arrived. The number on the Leads icon will indicate how many leads you have.
Leads can be added at any time to enable tracking of potential sales or jobs. Management Portal, Pipeline> +New Lead. Leads can be viewed through the pipeline and also through contacts.
To add Leads through the App, Leads>New


To edit Lead details on the Management Portal, CRM>Pipeline>Edit, on the lead that you wish to edit, make the necessary changes then Save.

To edit Lead details on the app, Lead, click the lead that you wish to edit, make the necessary changes then Save.
To delete a Lead on the Management Portal, CRM>Pipeline click the checkbox next to the Lead you want to delete then select action and click Delete from the dropdown box. Leads cannot be deleted in the App, although Leads can be converted to a Lost status.

In the Management Portal, CRM>Pipeline>Green Action Button and select the action you would like to make.
In the App, SWIPE FROM RIGHT

> NEW QUOTE
> NEW JOB
> NEW INVOICE
> CHANGE STAGE (if using Sales Pipeline)

All the Actions are also available at the bottom of the lead: SAVE JOB | QUOTE | INVOICE
To communicate with the new lead, Swipe from the Left.
SWIPE FROM LEFT TO:
> CALL
> SMS
> EMAIL

To change the Pipeline Stage of a Lead on the app, swipe left on the Lead that you wish to update then click on Change Lead Stage. Choose the Pipeline Stage that you want then Save the Lead.
The Lead can form part of a Sales Pipeline to track where all your leads are up to. We suggest you get the basic functionality working first and then take a look at the Pipeline later.
To add Notes to a Lead, simply open the App>Leads and then click on the Lead that you want to add notes to. Add Note is under History, add your notes, then hit Save.
The voice to text icon appears beside the space bar on the device keyboard. If this is not displaying, refer to your device settings help guide for your mobile provider.
Sales Pipeline
Yes, you can have multiple pipelines in your account. Settings cog > Pipeline > Pipelines.
Jobs
Jobs let you create and assign one or more forms to an agent in the field.
You can create a NEW job in the App by either selecting NEW in the top right hand corner or by selecting the round Plus button ( + ) in the bottom right hand corner.
To create a NEW job in your Management Portal, CRM>Jobs> +New Jobs.

Or, you can create a new job through the Scheduler in your Management Portal, CRM>Scheduler> +New Job.

To communicate with the Contact linked to the Job, swipe from the left. Note the Call, SMS and Email features will only work if the required details are available.
You will then have access to any Jobs that have been assigned to your User account.
There’s no need to fill in all details.
You can have a 'job' as annual leave or a staff meeting with not CRM contact selected. This allows you to 'block out' time for ths user to avoid double booking.
To edit a job, Management Portal,Jobs>View Jobs>Edit.
To delete a job, go to Jobs>View Jobs>Check the box next to the job that you want to delete then scroll down to select action>Delete.


You can upload/Import your existing jobs into Formitized, Jobs>Import Jobs

Under Job Details in your management portal, you can add:
Billing Name
Contact Name
Job Type
Invoice
Location
Job Title
Job Number
Order Number
Notes
Assign To
Priority
Due Date
Due Time
Job Duration
Job Value
Yes, you can add a new invoice to Jobs. In your Management Portal, Jobs>New Job>Job Details>Invoice> +Add New Invoice.

In the app, Jobs> + button for a new job >Add quote or invoice and select from the dropdown box.


Yes, you can assign a job to an existing invoice. If your business creates the invoice first, waits for payment and then does the job, then you can assign the job to an invoice that’s already been generated.
To do this, Management Portal, Jobs>New Job>Job Details>Invoice then choose an invoice from the dropdown menu.


Job value is a field in the job creation page that enables a value to be assigned against the job. This may or may not be equivalent to the job invoice value.
You can see the value of Future job in the Job Screen using the Due Date (From) and Due Date (To) to view any past or future Jobs.

Yes, you can add have Job fields populate in your form. The CRM contact and location element will connect automatically. You can also use the following object names for form fields to have that infomation populate form your jobs;
location - can be used as an alternative to the CRM location
jobNumber
orderNumber
notes
siteName
Queuing a Job means that anyone (or the Respective groups assigned) can see the job on their device, and the first one to accept the job will be assigned to the Job. To run this feature requires you to have Formitize 2.0.20.2+ app.
To Queue a Job Select Job>New Job> and in the Assign To field>select Queue.

To assign/dispatch a Job to an App user using the Management Portal is the same as assigning a Job to any other user, Job>New Job>Assign To and Select the User from the Drop Down Box. If it is an existing job you can Edit the Job and Assign the User.

Each user can have permissions Customized to what the Administrator would like them to see. In the User Settings on the Management Portal you can Turn Permissions off to things like Invoices, Quotes, the ability to Edit Job and lots more. To Customize these settings, Users>View Users> and Select Edit on the User you would like to Customize. As well as this you can also turn off the Value being visible on each Job on the check box at the bottom of the screen when creating the Job.
To Set the User’s Restrictions and permissions in the Management Portal, Users>View Users and Select Edit on the User you would like to Customize.

To use this feature, Jobs>View Jobs once you are in this screen you can view all jobs and the total value of the Jobs will display at the bottom of the screen, If you would like to Filter report view of this screen you can +Add Filter>Select Value from the Drop down Box and select the Value amount you would like to report on, you can also add other filters to this report eg. Job Types, Location, assigned to ect.
In The Management Portal, Jobs > Recurring > Search for the Jobs that you would like to reschedule the Recurring information on > Select the check box on the Jobs you would like to change > Select the action you would like to make on the recurring Job, make the changes > Select GO.
Yes you can assign a Job to a Group. When creating a Job you will assign the Job to the Group in the same way that you would assign the Job to an Individual User. When the Job is created all the members of that group will receive an individual job for them to complete, each Job for the Individual users will be given its own Job Id no. Forms attached to the job will need to be completed by all users.
You can complete a Job in the App and the Management Portal.
To Complete the Job in the Management Portal, Jobs>Scheduler>Click on the Job that you would like to mark complete and select Complete on the Drop drown Box.
NOTE - completing a job in the scheduler on the Management Portal will not trigger job type communication to send.
Or through the Job itself in the Management Portal,

In the App, Jobs>Select the Job that you would like to mark complete, Select "Complete" at the bottom of the screen.


The Sales Person field provides the ability to tag a salesperson to the job being created. A dropdown list of all users is available in order to select the relevant salesperson. You can then use the filters in the View Job screen to search Jobs that have been obtained by a specific sales person.

The Sales Source is a method of tagging the source or reference of the job sale in the same way you can tag the source of a new contact. The different sources will be presented as a drop down and new sales Sources options can be added to the dropdown at any time by simply adding the new source.

To edit a Job in the App you will need to go to the Jobs > Search the Job you are wanting to Edit > Swipe to the left > select the Edit option. This option will only appear for those who have the permission to edit Jobs.


A job type can send automation job communication. To see what communication will be sent from a job. Management Portal > Jobs > Edit > Communications Tab.
N.B. Communication will only show here if the job has passed the trigger point for the communication. For example if your Job Type communication is to send an email 12 months after the job is completed this detail will only appear in the communication tab if the job is completed.
Job Types
Job Types are like templates for the different types of jobs you perform. You can save a lot of time creating new jobs when you have set up the Job Type templates first.
Job Type templates include Job Details, Forms to Attach, Safety Rules, Assignable User Groups, Job Status Updates and Future Reminders.
Job Types enable different Safety First forms to be added for the different Job Types and the completion rules can also be customized on a Job Type basis.
Job Type Tutorial Video
Job types are like templates and very powerful. You can save time by creating templates for the different types of jobs you perform. Automated communication can be sent by the job type to save on time confirming and reminding customer about a job and also sending automated forllow ups for jobs that are completed.
No, its optional.
We encourage you to use Job Types because they are a great way to save time by presetting template information for each different type of job you undertake.
Job Type Tutorial Video
To create a new job type in your management portal, go to Jobs>Job Type>+New Job Type.
Job Type Tutorial Video
To edit a Job Type in your management portal, CRM>Jobs>Job Type Templates> select edit on the Job that you would like to edit. Editing a Job Type will only change for jobs that have not been created.
To delete a Job Type in your Management Portal, CRM>Jobs>Job Type Templates > select the Box on the Job you would like to Delete and then using the “Select Action” Drop down box select Delete
Job Status Updates is an awesome tool as it enables you to communicate effectively with your customers and team. Keep your clients and team informed with automated Job Updates based on the status of the job.
You can have as many Job Status Updates for each job type as you like.
Automatically send emails, SMS, Letters or create new Tasks triggered by the change in job status. You can customize the content of the Updates using placeholders to pull CRM information into your updates.
You can Add multiple Job Updates just by clicking the + button in your management portal under Jobs > Job Type Templates > Job Status Updates.

To remove a Job Status Update, click Delete in your management portal under Jobs>Job Type Template> (Create new Job Type or Edit an existing Job Type) Job Status Updates and click the Red Delete button.

Future Reminders lets you maximize the value of future business by setting up automated Job Reminders for each different Job Type to ensure both your customers and internal team are reminded about future appointments.
Future reminders can be sent X number of (days, hours, month), before the job date or after the job is completed in the App. Perfect for reminding clients of an upcoming job or a follow up after the job is completed.
You can have as many Future Reminders for each job type as you wish.
Future Reminders can be sent as Emails, SMS, Letters or internal Tasks can be created. You can customize the content of the Reminders using placeholders to pull CRM information into your reminders.
You can Add multiple Future Reminders just by clicking the + button in your Management Portal, CRM>Jobs>Job Type>(Either Create a new Job Type or Edit an Existing Job Type) and select the Future Reminders tab at the top of the screen.Job Type Tutorial Video
To delete a Future Reminder, in your Management Portal, CRM>Jobs>Job Type>(Either Create a new Job Type or Edit an existing Job Type) select the Future Reminder tab>Delete

No, you do not need to add line items to a Job Type, but by adding the line items it will allow you to generate an invoice for that Job Type quickly and easily from the Line Items.
A recurring profile is optional on a Job Type. In some instances the recurring profile will be different for each individual job that you do, even if it is the same job type.
You would use the recurring profile on a job type of a six monthly inspection as it is always done every six month but for a cleaning job it may be that the same work is being completed weekly and others every three weeks.
Recurring Jobs
Recurring Jobs are jobs that you do on a regular or repeating basis.
Examples include mowing a clients lawn once a fortnight or performing an Annual Termite Inspection.
For seasonal businesses such as Lawn Mowing or Pool Care, the frequency of the recurring job may change through the year due to seasonal changes. Formitize has the ability to filter your recurring jobs and you can edit them in bulk. Management Portal > Jobs > Recurring > Select Multiple > Edit Multiple.
You can also change the frequency and intervals in builk; Management Portal > Jobs > Recurring > Select Multiple > select action (change interval type, change duration, change frequency) > Go.
To view Recurring Jobs, go to Jobs in the Main Menu.
Then select Recurring from the dropdown.
This will take you to the Recurring page displaying all of your Recurring Jobs

To set up Recurring Jobs, Management Portal, Jobs>Select recurring from the dropdown +New Recurring Job, this will create a new job and you select recurring rules under the recurring tab.

In the App, Jobs> + for New Job> Select the recurring tick box at the bottom of the page to create the recurring rules.

To edit a Recurring Job, Jobs > Recurring > Select Edit on the job you would like to change.
To Delete a Recurring Job, Jobs > Recurring > check the box on the Job you would like to Delete and then select Delete in the Select Action Box and press Go.
Importing Jobs
Yes, you can. The Jobs Menu includes an Import Jobs option. Management Portal, Jobs>Import Jobs.
The Import Jobs feature enables you to upload a CSV or Excel file from another solution into the Job Dispatch system. The Jobs can then be managed via the Scheduler. Data from imported files can be used to populate all Job Details and the related fields to Forms attached to the Job. Management Portal, Jobs>Import Jobs.
You can view and manage imported Jobs via the Jobs Screen or the Scheduler.
The Scheduler
You can view and create both single (one-off) and recurring jobs in Scheduler, List or Map view.
The Scheduler is a calendar style view of all Jobs. You can manage both your People and your Mobile Assets via the Scheduler.
In the App the scheduler is the Diary.
The Scheduler is an integrated calendar-based Job Management system that you can access via the CRM>Scheduler menu.
The Full Scheduler in the Management Portal is available for viewing/updates only to the account holder whereas the Diary in the App can be accessed by field agents and other users who are given access to the app.
No, the Scheduler is a live calendar that dispatches jobs to all users for each business.
You can book jobs with no 'Client' to block out time in the scheduler to prevent double booking users.
Create a New Job in the Scheduler by selecting the green New Job button or by holding and dragging over the desired date and times on the Scheduler grid.
You can Drag and Drop new and Unassigned Jobs in the scheduler.
You can edit a Job in the scheduler by going to Jobs>Scheduler and then on the right side of the page, the list of jobs can be seen. Just click on a job and the edit job option will appear.
When clicking on a job under the scheduler, several options will appear. This includes the edit job, move (allows you to choose a new date and time and assignee), edit recurring profile (if the job is recurring), unassign, complete or delete a job.
You can re-assign a job from one person to another by dragging the jobs on the right to the user where the job will be assigned or select the job and use the edit or move function to re-assign the job.
Multiple Users can be assigned to a Job by dragging and dropping additional Users onto the created Job. Multiple users assigned to the job will need to complete all forms attached to the job.
Further development on the additional assignee functionality is under review to allow more flexibility with this feature.
An Unassigned Job is a job where it is not assigned to a particular User, this could be because it is a Queued Job or it has not been been assigned to a User.
You can view the Unassigned Jobs on right side of your Scheduler.
You can assign an Unassigned Jobs by editing the Job and assigning it to a User or by simply dragging the job to a User. To edit the Job in the Scheduler simply click on the Job>Edit job and Assign the User.

To view a list of Jobs in the Scheduler, Select the List button in the top right hand corner of the screen and this will direct you to your View Jobs Screen.

The Map View is where you can see the location of a Users job in a map. This show all jobs for the week in this view mode.
Hybrid view is where both the Scheduler and the Map view are available on one screen.
The layout of the scheduler can be edited through the view options: Day / Week / Month view. You can also edit the Date/TIme Format, Filters and job status colours using the tools in the bottom left hand corner.
The view options selected, are set to each user as their own views.

The different colors indicate the job status. These colours can be edited through, Management Portal, Jobs>Scheduler>bullet point menu at the bottom of the page.

Job type colors can be edited through, Management Portal, Jobs > Job Type Templates > Color. The job type color shows in the top right-hand corner of the job.

Each Job type can be allocated a different display color, so that at a glance you can see what types of jobs you have.
These colours can be edited through, Management Portal, Jobs > Job Type > Edit > Scheduler Color > Select your preferred color > Save.
Job types are created in the Jobs section. Management Portal > Jobs > Job Types > + New Job Type.
A new User can be added user the Scheduler in the Management Portal, Select the + Button at the bottom of the Scheduler screen and select User, this will take you to the New User Set up screen.

A new user group can be added through the Scheduler by clicking on the + symbol at the bottom left hand corner of the Scheduler screen and selecting User Group, this will re-direct you to the New User group screen where a new Group can be created.
Jobs will automatically convert to overdue if they are not completed within the expected timeframe.
You can view overdue jobs, Management Portal, Jobs>Scheduler>Overdue jobs can be seen on the right of the screen.

The App Diary
The Diary is in the home page of the App.
Forms
Forms are paperless copies of your existing forms. Formitize replicates the old paper forms you’re currently using and converts them into smart Mobile Forms that work with or without internet connection - via your App or secure website.
On the Dashboard menu, by selecting Forms, you can:
• View and edit all forms in your Management Portal.
• Create new forms.
• Start a new form or resume an unfinished form.
• Review all submitted forms, change the status, or delete any submitted form.
You can use forms in your business, office or out in the field. You can use all sorts of forms - from safety checklists to comprehensive Risk Assessments, Pre-Starts, Toolbox Talks, and Safe Work Method Statements.
You may need to use forms for various requirements in your business. Using paperless forms ensures efficiency and speeds up your business processes and systems.
You can view your forms directly from the Management Portal and through the App. Just click on the Forms Menu.
You can view your forms directly from the Management Portal dashboard. Just click on the Forms Menu in your dashboard.
We want to help you build your forms so we have 3 options for you:
You can use our Form Builder, or the Wizard (which can build a range of standard business forms automatically for you), or you can upload your form and our team will build it for you!
Option 1 - Use the Form Builder to create and edit your own forms using the drag and drop tools
Option 2 - Create Form Using Wizard
Option 3 - Upload your form here and we will build your first form for free for you.
The Video Link below will demonstrate some of the amazing features that are available for you to utilize in the Form Builder.

When you have completed the New Form in your Management Portal, simply click Save and you’re done.
Once you have added a new Form and deployed it, it will be visible in your Forms list in the App.
Yes, you have the option to upload your form and the Formitize team will build it for you. You may not be interested or have time to build your own forms so we have a very experienced Form Building Team who would be delighted to build your form for you.
As part of the Free Trial, we can build your first form as a proof of concept for free. Subsequent work may incur a charge so please upload your form and we will be in touch to discuss and where appropriate, provide quotation.
The form bank is also available with a range of forms that may suit your needs. Management Portal > Forms > Form Bank > select the form that you would like to add to your templates > Add to templates. From the form templates you will be able to edit the form to further suit your needs.
Form Bank Tutorial
Yes, you can fill out forms in the Management Portal.
Management Portal > Forms > Start a new Form.
You can also cover off your Work Safety Requirements by adding Safety First Forms to Jobs. Safety First Forms can range from simple safety equipment checklists through to a full Safe Work Method Statements. You can set Job Rules to force Safety Form completion before allowing Job Form access.
Kiosk mode is a fast processing option with auto-refresh to clear form for instant re-entry. Normally used for public facing, repetitive testing and measurement type environments.
When using a Kiosk mode form in the App to exit out of the form the default code is 1111 this can be edited per user profile. Management Portal > Users > View Users > Edit > Kiosk mode PIN > Edit > Save.
Yes, there are options that you can check in the Form Builder that limits the users who can view the forms: you can mark the form as app and portal form, visible to all app and management portal users; or portal form, visible only to management portal admin.
User Groups can also be selected as to which groups can 'start and view' a particular form template and also 'edit'. This is selected in the details for the form template.
Form Actions are events that trigger automatically when a form is submitted. As soon as someone in the field submits the form, this Actions page will determine what happens next. This could be and email or SMS of the PDF sent to the customer. If a form is connected to a job the form actions will trigger once the job is completed.
Actions can also be triggered by certain answers being given in a form, for example if 'no' is an answer on a certain question more questions will be asked but if the original answer was yes then the additional questions would not be required.
Forms > View Form Templates > PDF > PDF Options;
Form Options allow you to set items such as:
Add Prefix to Submitted Form ID in PDF
Set Starting PDF Sequential Number
Reset Form Number
Display Geo Coordinates in PDF Footer
Display Location Field Coordinates in PDF
Display Submission Date in PDF Header & Footer
PDF Number Options
Default Submission Status
Submitted Form Expiry (Days - “0” for Never)
Prevent Expired Status (Select None for all Status’s)
Once a form has been submitted, it goes into the Submitted Forms page where you can make further changes to your forms.
The submitted forms page can be customised to be able to see form fields as columns and to be able to group form templates together in one tab.
Submitted Forms Tab Tutorial
There are different ways to access Submitted Forms in the Management Portal:
Forms>Submitted Forms
Home > Forms > Submitted Form
In the App, Forms> +Submitted Tab
Customer submitted tabs are avialble in the Management Portal and the App based on Group visiblity when creating the tab/s.
Submitted Form Tutorial
Submitted forms can be viewed, edited and sent as a PDF or SMS.
To change the status of a Submitted Form, Management Portal, Forms>Submitted Forms>Check box on the line of the submitted for you wish to edit>Select Action at the bottom of the screen>Change Status, where you can choose from all of the status options. Choose your status then hit Go and the status will be updated. If you’d like your own status, just let us know and we’ll add it for you.
A form status can also be changed by an action on the form template. Management Portal > Forms > View Form Templates > Actions.
You can separate the different Submitted Forms by type. For example, you have your Invoices, Incident Reporting, Near Miss Reports etc. You can use the existing types or you can Press the +New button then add a new type for whatever market and sector you want. You can also customize the column headings when you do it.

To automatically create a new task from a Submitted Form, you will either edit an existing form or Create a New Form. To add this to an existing form select Forms>View Forms, select Edit on the Form you would like to add the Action to >Edit Form>Actions>+New Actions, Select Create CRM Task from the Action Type Drop down Box and fill in the details for the specific Task that you would like to be completed once the Form has been Submitted. Once you are happy with the Action, ensure that you Save and Deploy your Form so that the Action can start taking effort in your Workflow.


One of the benefits of Formitize is that all form field responses can be extracted and reported enabling businesses to gain insights that are not normally available from a PDF, Word or other type of saved form.
Metadata represents the form field data enabling every single form field to be available for reporting purposes via the CSV Report Building Tool.
You can extract the data from Submitted Forms via the CSV Report Builder. Management Portal, Forms > Form Reporting.
You can submit a form either through the Management Portal or the App.
To submit the form through the Management Portal, open the form you would like to complete and when you have completed the form you select Submit in the top right hand corner.
To submit a form in the App, select the form that you would like to complete, once you have finished filling in the form select Submit at the top right hand corner of the screen.
A form can be archived through the Management Portal > Forms > Submitted Forms > select the form in the checkbox on the right hand side > select action at the bottom of the page > archive > go.
To unarchive the form use the archive filter in the Submitted forms page to see the archived form > select the form in the checkbox on the right hand side > select action at the bottom of the page > unarchive > go.
A form can be sent as a PDF automatically through Form Actions.
Additionally forms can be manually emailed once submitted. On the Management Portal > Forms > Submitted Forms > PDF > Email and either use an email template or free text to email the PDF to the recipient.
A PDF can also be emailed through the App > Forms > Submitted Forms > Swipe to select email.
CSV Report Builder
The CSV Report Building Tool is a very useful way to generate reports based on information being collected in any of your forms. To locate the Report Builder, Management Portal, Forms > Form Reporting.
To generate a report in your management portal, Forms > Form Reporting. Select your Form and the date range you wish to report on. (Note, if you leave the date fields blank, the report will be based on all forms submitted).
You can then add and remove columns as required and filter the data until you have created the desired report. This can also be saved as a report template and be set to email automatically on a recurring basis.
Pre-Set Templates are templates that you can create then use again in the future.
Saving a Preset Template is quick and easy. In your Management Portal, Forms > Form Reporting > CSV Report Builder. If you think you will use the Report you have created again, you can save it as a Template.
The next time you want to generate the report, just select the form, the date range and the template and your report will auto-generate. Pre set template can also be emailed automatically on a recurring basis.
Tasks
Tasks are work that you need to do, such as calling your clients, sending quotes, etc. Tasks are for internal portal users only.
Jobs are work involving your client, such as inspections. Tasks are work that you, as the user, need to do such as schedule inspections or calling your clients.
You will find the Tasks in the CRM section in your Management Portal > Tasks.
Tasks are not available in the app as they are for internal use by portal users only.
To create a task, Management Portal, CRM>Tasks> + New Task, fill out the task details and save.
To edit a task, Management Portal, CRM>Tasks>Edit. Make changes >Save.
To complete a task, Management Portal, CRM>Tasks>Edit>Complete Task.
To delete a task in your Management Portal dashboard, CRM>Tasks>Checkbox next to job you would like to delete>Select Action>Delete.

A task can be assigned to any users when creating a new task, Management Portal, CRM>Tasks> + New task, fill out the task details and save.

A task can also be re-assigned once it has been created. Management Portal dashboard, CRM>Tasks>Checkbox next to job you would like to re-assign>Select Action>Assign. Just above the Select Action tab you will be able to select the user that you want the task to be assigned to.
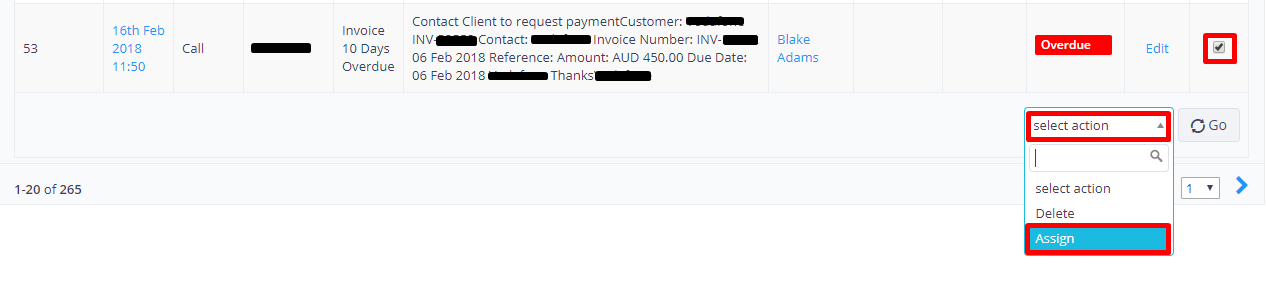

Xero
Xero is an online accounting system designed for small businesses and their advisors. It’s simple, smart and secure.
Xero would be used as your accounting solution you can manage your payroll, HR, billing expenses, cash flow tracking, GST, etc. Xero has incredible integration capabilities with Formitize.
Formitize CRM has a complete two-way integration with XERO. Management Portal > Settings cog > Integrate > Accounting Software > select Xero as your accounting package.
This will auto-populate your CRM with all Xero data including Customers, Suppliers, Invoices, Purchases, Line Items and Tax Rates. It is a very comprehensive integration that syncs all data between the two systems.
It takes around 10 minutes to sync all information between Xero and the Formitize CRM.
Formitize will pull in all of your Xero invoices, your customers, your line items and tax rates will automatically be pulled in from Xero into the CRM.
Follow these steps in the same browser window (Chrome is preferred for all Formitize usage on a desktop) and don't open new browser tabs:
1) Go to Xero (or follow this link to Xero's dashboard https://go.xero.com/dashboard/) and click "logout" in the top-right corner's dropdown to be sure you're logged out from Xero.
2) Go to the Formitize web Management Portal > Settings cog > Integrate > Integration Profile > https://service.formitize.com.au/integrate/profile
3) Delete the existing authentications listed here by ticking the checkbox and selecting "Delete" from the bottom right actions dropdown then "Go".
4) In the top-right corner, click "+ New Profile" and select "Xero" from the first dropdown and then "create new profile". It will then take you through the Xero authentication steps.
For all Xero set up questions please contact Xero directly.
Formitize can pull data in MYOB Account Right and Essentials format.
Our Quickbooks integration is coming soon.
To remove your Xero integration from you Formitize Account in the Management Portal,Forms > Integrate > Profile > select the check box and Select Delete in the Select Action Box > Go.
Paying your Formitize Account
Yes, we accept Paypal and Credit Card services so you know that your payment information is safe and secure. We accept PayPal, Mastercard and Visa. Account payments can be arranged for enterprise clients. Monthly billing amount is based on the number of registered users on your account.
Formitize does not charge a fee for card payments.
To view the Invoices for your Formitize account in the Management Portal, Settings cog > Company Profile > Formitize Invoices.
Card Payments Using Stripe
Yes. You can take payment through your Formitize app. If you would like to take immediate card payment through the App, you will need to set up an account with Stripe.com, when you select “Take Payment the card gateway will open. If you are using an existing card payment gateway, just select “Record Payment
To take card payment CRM>Accounts>Invoice. You can select out which invoice and then you will have several payment options which includes card payment.

Stripe is an online payment processing for businesses.
Stripe is an integrated way to accept payments through the Formitize App.
Transaction and service fees. Rates vary from country to country, please visit www.stripe.com to view current rates.
To get started with Stripe you will first need to set up a free account. The great thing about Stripe is that you will be able to test out the gateway on your Create website before you activate your Stripe account.
Click here to create your Stripe account: https://dashboard.stripe.com/registerIn the Management Portal > Settings cog > Integrate > Stripe Payment gateway and enter your Stripe keys in the relevant sections
- Select Save.
-
If you are using your invoices etc through the Formitize CRM (Accounts in App) you are now integrated to take live payments. No further action required.
Resources
The Resources section is like a Document Library. You can upload documents like Safety Documents, Licences, Certificates, Insurance Policies and have them available at all times.
Resources is is an like an e-Library. If you upload a document here in the Resources section, it can then be visible to field users. You can add your own folders and call them whatever you like. Then you can add your files and documents into those folders and they will sync to the app users with User Group permissions for visibility.
Resources are perfect for things like Safety Documents and Procedures. You can upload documents to the portal and everyone has access to view them. All of your documents can be found in one centrally managed location. Resources is perfect for Safety, MSDS, Procedures, Policies, Catalogs & more. With Resources, you have Full Version Control with integrated Document Expiry Notifications.
This Resources feature is very useful for corporation manuals. If changes are made to your documents, all you do is update the document in Resources and it automatically syncs to everyone’s devices. Once new resources are uploaded they are available to all users that they are relevant to according to User Groups.
You will find Resources in the home page of your Management Portal > Resources.
You will find Resources in the home page of your App.
You can view your Resources by clicking View Resources in your Management Portal home page, Resources Dropdown Menu: View Resources.
You can view your Resources in the App by clicking the Resources icon in your app’s home page.
You add a new Resource by opening Management Portal. Resources>New Resource. Your new Resource is automatically synced In the App.
You can store your Resources in Folders. In your Management Portal, create new folders or use existing ones to organize your Resources, making them easy to locate.
In your Management Portal, you have the option to create a New Folder when adding your new Resource.
To Customize Folders, You Upload the Resource Documents in the Resources Section of the Management Portal. You can create your own Folders and name them whatever you want.
To delete a Resource in your Management Portal, tick the checkbox in the bottom left corner then select action in the drop down menu and delete the resource.
Yes, you can set Resources to only be available to select group / groups of Users.
The Expiry Date will notify the users when the Resources needs to be updated. When you add a document to Resources, you can set the expiry date for the document. Admin will be notified of an upcoming expiry on resources, when they are due and also when they expire if they have not been actioned.
In your Management Portal dashboard, you will see details about your Resources both expiring or expired. The administrator will receive an email reminder 30 days and 7 days before expiry and then again when it actually expires, if it has not been actioned already. Resource expiry reminders are perfect for managing licenses, registrations or MSDS’s, agreements and contracts or any document that has an expiry date.
Resource documents whose expiry dates are in blue are ok; anything in orange is within 30 days of expiry and you will receive notification about it; and when it does expire it will turn red. You can see the status of your documents at View Resources.
To print a resource, Management Portal, Resources>View Resources>Select the Resource - this opens the document in your browser where you can select Print.
API
An Application Program Interface (API) is a set of routines, protocols, and tools for building software applications. Basically, an API specifies how software components should interact. Additionally, APIs are used when programming Graphical User Interface (GUI) components.
Further information on our API can be found, Management Portal > Integrate > API.
Data
All of your data is stored in the cloud. Formitize uses Global Cloud Storage to optimize speed and performance for clients.
The Cloud is simply a modern way of storing data and information in centralised data storage facilities so that you don’t have to maintain your own servers and network or save information to your own hard drive - we do it for you! This provides you with secure, expandable storage that is all included in your Formitize monthly fee.
Every effort is made to ensure that your data is safe and secure. We work with government agencies and many of the world’s largest corporations where data security is paramount and we treat your data with the same priority.
Yes, Formitize will back up your data regularly. Our app is a powerful, super fast application with an app style menu system that is simple and intuitive. We offer auto 15-second backup during form entry; Auto caching and syncing; Manual Save option; and Automatic version update.
Only you and other users to whom you grant user permissions can access your data.
Feature Requests
Our Technical Team are constantly looking at ways to improve the Formitize experience. We regularly update our system and detailed update information is available through the Management Portal, Help>Updates.
You can influence the Feature Roadmap by adding a contacting the support team through the Management Portal > Help Menu > Raise a Support Ticket.
You can raise this through the support team > Help > Raise a support ticket on the Management Portal and App to add suggestions for new features - we really love to hear your ideas and listen carefully to suggestions from our Users.
Reports
To create your Income and Expenditure Report, CRM > Reports > Income and Expenditure. On the report screen you will see your date ranges that you can customize depending on what date range you would like to capture in your report. This feature is only avialable to admin users.
Yes you can create reports in Formitize, to Report on your CRM, CRM>Reports.
Yes you can export your CRM information into a CSV Report using the Report Function in the CRM. CRM>Reports>Download CSV
To create a report on your contacts in the Management Portal, CRM>Reports>Download CSV. You can filter the information to only show what information you require in the your report using the +New FIlter Button
To Create a Report on a Users Task in the Management Portal, CRM>Reports>Task Log. You can filter this information in the drop down menu's and also add new filters using the +New Filters button.
To create a report on your Automated Reminders in the Management Portal, CRM>Reports>Task Log. You can filter the information using the +Filter Button.
To create a Report on your Quotes using the Management Portal, CRM>Report>Quotes. You can filter this infomation using the +New Filter Button
To create a report on your Invoices in the Management Portal, CRM>Reports>Invoice. To filter your report use the +New Filter.
To create a report on your Purchases in the Management Portal, CRM>Reports>Purchases. You can filter this information by using the +New Filter button.
Safety First
The Safety First solution can incorporate all safety related forms such as Job Safety Analysis (JSA’s), Toolbox Talks, Take 5’s, Pre-Start Vehicle, Equipment and General Safety Checks, Working at Heights, Confined Spaces and Hot Work Permits, Incident, Near Miss and Non-Compliance Reporting. All required safety forms are customizable and can all be managed beautifully through the one powerful, yet super simple to use, Safety First solution.
The Safety First solution can either work as a stand alone mobile safety solution or as an integrated part of the current Formitize Job Management and Mobile Forms system.
Different Job Types can be automatically allocated different Safety First forms to ensure the correct safety requirements are matching the related task, every time.
When a User receives a Job in the App or the Management Portal, a separate Safety First section will appear containing the relevant safety forms for that job. The mobile forms include smart features such as integrated tagged photos, sign on glass signatures, time and date stamping, GPS location and more to provide higher levels of information, more efficiently. If desired, a permission can be set that prevents the Job Forms being accessible until the Safety First section has been completed.
The user completes the Safety First section, the Job Forms then becomes accessible and the remainder of the job can be completed safely with management confident in the knowledge that all safety components have been assessed, checked and completed in a consistent, compliant format.
The Safety First forms can be separately submitted so that management have full visibility of the safety information completed from the field before the actual job has even started. Dedicated actions and notifications can be triggered based on the status of the submitted Safety First forms or even any answers contained in the forms.
The Time, Date and GPS co-ordinates of all Safety First form submissions are recorded - providing management with enhanced visibility and ensuring accountability through all safety processes. All safety related forms are securely stored with unique ID, time, date, location and user details. All elements are fully searchable thereby providing a comprehensive audit trail and archive.
All Safety First forms are automatically document managed, a documents expiry details, descriptions, version control management and author details are managed withing your account. Even better - the solution automatically monitors the form expiry dates for you and notifies you when documents are approaching their expiry dates with multiple reminders automated from 30 days prior.
Also included with the Formitize solution is the powerful Resource management solution. Read-only resource documents can be added to the Resource Library such as Operating Procedures, Licences, Registrations, Certificates, Safety Policies and MSDS’s (Material Safety Data Sheets). The same automated document control and notification system will also monitor the expiry dates of these resource documents to ensure that all documents being used are current and valid.
Resource documents are uploaded once in the secure web-based Management Portal and sync automatically to all mobile user devices. This ensures that everyone has constant access to only the latest document versions. Documents can be stored in custom named folders to suit your business.
To create a Safety First form in the Management Portal you will either create a New Form or you can edit the settings of an existing form. When creating a new Safety First Form you will be asked if the Form you are creating is a Safety First Form. If you would like to edit an existing form to be a Safety First Form you will go to, Forms>View Forms>Edit on the form you would like to change to a Safety First Form and select the Safety First Check Box.
To add a Safety First Form to a Job using the Management Portal, Jobs>New Jobs>Forms>Select Safety Forms to attach.
(Please note that if you have not created any Safety First Forms the list will be empty)
To add a Safety First Form to a Job using the App Jobs>New>Safety FIrst Forms>Add
To add a Safety First Form to a Job Type in the Management Portal, Jobs>Job Type>+New Job Type>Safety First Form, this is also where you will set the Rule that runs with the Safety First Form.
Diary in the App
In the app you will find the Diary on your Home Page
To adjust the settings for the Diary in the App, select the menu button in the top left hand corner of the screen.
In the setting of the App Diary you can view in Day, Week, Month and List. You can View in 5 Minute, 15 Minute, 30 Minute and 1 Hr Intervals, you can also show and hide Specific days, for example if you don't work Saturday and Sunday you can hide these days so they don't appear on your Diary Calendar.
Administrators and Users with permissions are able to view other Users Diaries in the App.
In the App Diary, select the User Icon (people image) in the top right corner. This will bring up the list of Users that you can select and view.
To create a New Job in the App you simply touch and hold the date you would like to create the Job for and the New Job Screen will appear.
To move a Job in the Diary you simply drag and drop the Job you would like to move to the date you would like to change it to. You can also click into the job and select the red "Edit" button to edit the job date, time and duration.
To extend and reduce the time assigned to a Job you will need to be in Week or Day View, you can then touch and drag the Job down or up to extend or reduce the time as needed.
To edit a Job in the Diary you simply touch the Job you would like to edit and select Edit at the bottom of the screen.
Yes, you can Re-assign a Job to another User simply select the Job you would like to re-Assign, select edit at the bottom of the Job View and you can then re-assign the Job under the Assigned To: field.
The permission settings for the diary can be found in the Management Portal, Users>View Users>select the user you would like to view/edit>Permissions. Here you can set if you would like the User to be able to Edit Jobs, View Other Users and lots more.
Tutorial Videos
Creating an New Job - Tutorial Video


Setting up your CRM - Tutorial Video


Form Builder - Tutorial Video
0:00 - Intro
0:41 - Form Details
3:32 - Form Images Tab
3:53 - Form Builder Tab
4:50 - Form Builder Toolbox
6:56 - Form Builder Deleting Fields
7:21 - Form Builder Building an Example Section
10:10 - Form Builder Events
10:50 - Form Builder - Multiple Choice Fields
17:35 - Form Builder - User Variables / Auto Populate
19:53 - Form Builder - CRM Client / Location Look-up
21:07 - Form Builder - Database Look-up
23:22 - Form Builder - Tables
24:36 - Form Builder - Webforms / Form Preview
27:37 - Form Actions - Tab
31:50 - Form Company / User Variables Tab
32:08 - Form PDF Tab
33:41 - Form Bank
35:39 - Form Builder Saving / Deploying
Submitted Forms
Yes, You can Convert a Submitted form to a Job in the Management Portal, Forms>Submitted Forms>View Submitted Forms>Select Edit on the Form that you would like to convert to a Job> Actions>Convert to Job.

You can create customized submitted forms tabs in the Management Portal allowing you to see any information from within the form at a glance, creating a custom submitted forms tab alsp makes it easy to search your forms.
To create the custom tab in the Management Portal, Forms>Submitted Forms>+ New. In the settings of the Custom Tab you can create a name for your tab, choose what forms you will see, choose which groups will be able to view the Tab and you will then set your columns and connect any new columns to the fields within the form.
Tutorial Video

You can delete a custom Submitted Form tab in the Management Portal, Forms>Submitted Forms>+New / edit>select the tab you would like to delete>scroll to the bottom>Delete
To edit a custom Submitted Forms tab in the Management Portal, Forms>Submitted Forms>+ New / edit >Select Tab you would like to Edit>Make changes>Save.
To see that a submitted form has been emailed. Management Portal > Forms > Submitted Forms > Edit > Email Log.
Webforms
If you would like Webforms to be available for you to use please email support@formitize.com with your Account and User Name.
Webforms are electronic forms that can be completed by anyone from a web-browser on their computer, tablet or smartphone. Formitize forms can be custom built using the drag and drop form builder and importantly, all the automated form actions and integrations are included such as CRM updates, sales pipeline management, automated emails, notifications and so much more.
Two Webform Types:
There are two clear webform application types available:
-
iFrame Webforms
-
eLink Webforms
1. iFrame Webforms
iFrame webforms are designed to be embedded into your website. You can use the drag and drop form builder to design the form to collect exactly the information required. The size of the form can be adjusted to suit the available dimensions available on your website. The most common iFrame webform would be the Contact Us form added to your website as in the example below:
2. eLink Webforms
eLink webforms are a powerful way to collect information. Again, the forms can be built using the drag and drop form builder. The eLink forms can be partially completed by you before being sent to your client (details such as name, address, pricing etc) The client can open the form on their desktop, tablet or smart phone, complete the required information, sign on screen and submit. When the form is submitted, a whole range of automated actions can trigger.
eLink webforms are the perfect solution for Pre-Inspection Agreements, Terms & Conditions, Orders, Variations, Vendor Applications, Employee Applications, General Agreements, Contractor Submissions and so much more.


iFrame Webforms
iFrame webforms are designed to be embedded into your website. You can use the drag and drop form builder to design the form to collect exactly the information required. The size of the form can be adjusted to suit the available dimensions available on your website. The most common iFrame webform would be the Contact Us form added to your website as in the example below:
NOTE - CRM fields need to be prefilled in webforms are they are not searchable by third parties to protect the privacy of your account.
eLink webforms are a powerful way to collect information. Again, the forms can be built using the drag and drop form builder. The eLink forms can be partially completed by you before being sent to your client (details such as name, address, pricing etc) The client can open the form on their desktop, tablet or smart phone, complete the required information, sign on screen and submit. When the form is submitted, a whole range of automated actions can trigger.

eLink webforms are the perfect solution for Pre-Inspection Agreements, Terms & Conditions, Orders, Variations, Vendor Applications, Employee Applications, General Agreements, Contractor Submissions and so much more.
Converting a form to a Webform needs to be done in the Management Portal, Forms>Start Resume Form>Select the form that you would like to Convert to a Webform and select the “Convert to Webform” checkbox.

To allow the Webform functionality to be available on a form in your Formitize account, Forms>View Forms>Edit on the form you would like to enable as a Webform and select the “Webform Enabled” Check box>Save.
To email an eLink Webform from the Management Portal, Forms>Start/Resume Form, +Start New Form >Select the form from the Drop down Box>Start. The form will open and you can check the “Convert to Webform? Check Box. You can now Pre-fill any information that you would like to appear in the eLink form when the recipient receives it, once you are ready to email the form select Save, the link actions will appear, select Email Link, the email screen will appear and you can then enter the Mandatory information and Send Email. Once you have sent the email you can close the screen, all saved Webforms that you have emailed will stay in your saved forms until your Recipient Submits the form and it will then appear in your Submitted forms.


Yes, you can pre-populate any information that you would like into the form before pressing Save.
Yes, Once you Select “Email Link” the email screen will appear allowing you to completely customise the wording of the email that the recipient receives and use templates created in Management Portal > Settings cog > Email and SMS > Templates.

Email Placeholders allow you to select information you would like to insert into the email without having to type the information in. To insert a Placeholder select Ctrl + Space Bar and this will bring up your available options.

No, Once a recipient has submitted a Webform they will no longer be able to access the form.
Yes, you can send a submitted form back out as a Webform. Forms>Submitted Forms> Select Edit on the form you would like to send. The form will open and you can check the “Convert to Webform? Check Box. You can now Pre-fill any extra information that you would like to appear in the eLink form when the recipient receives it, once you are ready to email the form select Save, the link actions will appear, select Email Link, the email screen will appear and you can then enter the Mandatory information and Send Email.


All the same actions on a standard form template can trigger from a Submitted Webform
Emailing a webform to my company email address
Tutorial | Emailing myself from webform submission
Yes, Recipients can added Images into the forms where the Photo Capability has been built into the form Template. These uploads are only availbale to view in the portal not on the PDF.

https://www.youtube.com/watch?v=vYTWHb5od8k&t=3s
A powerful new feature allowing you to receive fast and accurate information from your current or future customers. Webforms are electronic forms that can be completed by anyone from a web-browser on their computer, tablet or smartphone. Formitize forms can be custom built using the drag and drop form builder and importantly, all the automated form actions and integrations are included such as CRM updates, sales pipeline management, automated emails, notifications and so much more. Come visit us at www.formitize.com/ to get more information on our amazing features and to start your free trial today.